How to Lay Cement Tile
Granada Tile's cement tiles are hand made with a variety of pigments in a cementitious base. Because of the nature of the cement and the pigments, these tiles are subject to color and tonal variation. When laying, we recommend blending tiles from several pallets and boxes.
When taken out of their boxes, some tiles may have residue (efflorescence) on the surface. When cement dries, the lime in the cement rises to the surface and reacts with carbon dioxide to form calcium carbonate, a white powder or film on the face of the tile. The efflorescence can typically be removed during the cleaning and buffing process after installation. Sealing the cement tiles usually prevents efflorescence from re-appearing.
Granada Tile provides these general guidelines as suggestions to installers. Since applications and job site conditions vary, the installer is ultimately responsible for ensuring proper installation and sealing of the tiles.
For more detailed information and instructions about laying your tile, we highly recommend consulting the Cement Tile Manufacturers' Association's excellent and free Handbook. The Tile Council of North America also produces a very detailed publication entitled the TCNA Handbook for Ceramic, Glass, and Stone Tile Installation that is for sale at www.tileusa.com.
I. INSTALLATION EQUIPMENT and MATERIALS:
-
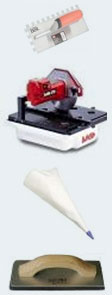 Thinset Mortar (For light colored tiles, use white color thin-set and for darker colored tiles, use gray color thin set material.)
Do not use ceramic tile adhesive. - Tile Spacers (1/16" or 1/8", depending on the desired aesthetic; for Echo Collection tiles, 1/16" is most common)
- Trowel with 1/2" with semicircular notches
- Sponge
- Bucket
- Wet Tile Saw with Diamond Blade
- Unsanded Regular (NOT Epoxy) Grout
- Grout Float or Grout Bag
- Penetrating Sealer for Cement / Concrete - (One of the best sealers is DryTreat STAIN-PROOF)
- Clean mop
- A 17" Floor Polisher, with sand screen #220 (optional), green and white pads
II. FLOOR AND WALL PREPARATION:
- Prepare a perfectly level, clean, dry, slightly rough surface in concrete 3/4" below the desired finished floor height (5/8" for the tiles and 1/8" for mortar - double check the height of the particular tile you are using as there is some variation by size and collection).
- Let the concrete slab surface dry completely before laying the cement tiles, otherwise the moisture in the concrete will evaporate through the tiles, resulting in powdery white limestone deposits (efflorescence). Do not lay cement tiles directly onto fresh (uncured) concrete. IMPORTANT: Some slabs may continue to release moisture on the surface even after fully cured. Test your slab by taping a small piece of plastic (polyethylene film) to the area to be tiled. Make sure all edges are thoroughly taped down. If moisture accumulates on the underside of the plastic, you should apply a waterproofing membrane before proceeding with the installation.
- To prevent cracking or fracturing from the movement of the substrate and ultimately the earth itself, be sure to include expansion, construction, isolation, contraction, generic and perimeter joints where appropriate. Consult your architect or engineer.
- Wall tile can be installed over drywall, plaster, cement block, cement backer board (for moist areas). The surface should be flat, smooth, and dry and any loose paint or cracked surface should be scraped off and patched. Be sure to use thinset behind the backer board, not to adhere the backer board but rather to fill voids beneath the backer board.
III. TILE SETTING:
- Decide on the layout of the tiles and put them in position to ensure the result before installing them. If you choose a traditional carpet style pattern, start with the center pattern, then lay down the border tiles. Finally, lay down the outside tiles and cut them to fit using a wet saw with a diamond blade.
- Using a sponge, wet the back of the tile completely to enable the thin set to adhere to the tile. For more complete instructions, follow the thinset manufacturer's guidelines for laying floor tile.
- Evenly apply the adhesive mixture to the floor subsurface, using a trowel with 1/2" semicircular notches. Then, cover the entire back of the tile with thin set material. Always brush the adhesive in the same direction, otherwise air will be trapped and the tiles may lift up.
- Lay the tiles, and press them into place with the palm of your hand, ensuring that they are perfectly level with each other. (Don't beat the tiles with a tool - such as a rubber hammer - or microcracks may appear over time.) Be sure that that the tiles are perfectly level throughout the installation. If any of the tiles are not level, remove them and backfill with a small amount of mortar to make them level.
- Use the 1/16" tile spacers to separate each tile.
- Move the tile back and forth so that the new tile is leveled with the first tile you installed. Bring the tiles together to a grout joint of 1/16" and continue laying them until all tiles are set in place.
- Immediately clean thinset or mortar off the face of the tiles with a clean sponge. The longer you leave it, the harder it will be to clean it off. Do not let thinset or mortar dry on the face of the tiles or it will be very difficult to remove without damaging the tiles.
- Let the thinset mortar dry completely, usually 2 - 4 days, before grouting.
IV. GROUTING:
- Since the tiles are not pre-sealed, you need to seal them first with penetrating sealer following the manufacturer's instructions. This will help to protect the tiles from being stained by the grout. DO NOT USE DARK COLORED GROUTS because they contain fine carbon pigment; this type of pigment is very invasive and can cause staining on the lighter portion of the tile, even when it has been pre-sealed. Instead, use a simple cement-based (regular) non-sanded grout in a light color such as white, bone, or light grey. EPOXY GROUT is NOT recommended and will cause irreversible damage to your cement tiles.
- Completely fill the gaps between the tiles with grout, using a rubber float or a grout bag.
- Immediately remove any excess grout with a clean damp cloth or sponge. Do not let any excess grout dry on the surface as it may be difficult to remove and may stain the tiles.
- Mist the grout with water two to three times per day as it cures to slow the hydration process and minimize grout cracking or shrinking.
V. CLEANING CEMENT FLOOR TILES WITH A MOP OR CLOTH:
- After the grout is dry (usually after 48 hours), use a clean mop or cloth to clean the cement floor and wall tiles thoroughly. If tiles are not adequately clean, use a 17" floor polisher with green and white pads to clean the cement floor tiles thoroughly. Wet the floor enough so that the floor polisher is always working on a wet surface. Use a back
and forth motion, turning slowly from right to left until the entire area has been covered. Use the #220 sand screen pad only if the tiles are not completely cleaned with the green and white pads.
- Drain any remaining water on the tiles and finish drying with a dry, clean mop or cloth.
VI. SEALING:
- Cement tile surfaces must be cleaned, free of grease, oil, dirt, wax or any other foreign matter.
- Apply a high quality penetrating sealer for cement and concrete tiles and carefully follow the sealer manufacturer's instructions. Do not place anything on the tile until the sealer is completely dried per manufacturer's instructions.
- If desired, buff the tiles with the floor polisher and white pad using a back and forth motion. This will give your tiles the shine desired. Do this step as long as you like.
GENERAL NOTE ABOUT SEALERS: Like natural stones, cement tiles are porous by nature and therefore need to be sealed to avoid staining. Penetrating sealers coat the cement particles in the tile making it less likely they will retain stains. They do not change the surface of the tile at all. Our clients have had good experiences to date with DryTreat's Stain Proof penetrating sealer.
Topical sealers create a barrier on the surface of the tile so that stains do not reach the cement. Topical sealers have different finishes: shiny and matte. Topical sealers are not generally recommended for exterior applications as the sun may deteriorate them quickly. Topical sealers can also make tiles more slippery and so are not recommended for wet areas.
*** CLEANING AND MAINTENANCE INSTRUCTIONS ***
The cleaning and maintenance instructions are very simple. For daily cleaning, you can use Dry Treat's Rejuvenata™ ACTIVE or other suitable pH neutral soap (such as clear liquid dish washing soap) and warm water. Avoid using any acids or bleach on the tiles since they may react with the concrete and damage the surface of the tiles. Also avoid cleaners with detergents because they can leave a residue which is difficult to rinse off and collects dirt.
Avoid spilling acids on the tile, or if accidents happen, clean them up promptly. The longer the spill stays on the tile, the more likely it will leave a lasting mark.
Depending on the sealer and the use, the tiles will need to be re-sealed every couple of years. DryTreat's STAIN-PROOF is a permanent sealer that does not need to be re-applied.
Laying Cement Tile: Things to Know Before You Start
Styling up a home, restaurant, bar, cafe or any other type of establishment requires a great deal of knowledge of design and the various properties of certain materials used in the design process. Whether you’re working on the flooring for your home, redesigning the floors and walls for a new client or trying to spruce up your business to meet your aesthetic needs, installing cement tile can be a great way to elevate the interior.
Before jumping right into designing (or redesigning) any floor, always take the time to fully understand the process from start to finish. This is especially important for laying cement tile, as there are some basics that need to be understood in order to get the desired result. You can, of course, always hire a professional to assist with the installation process of cement tile once you know the look (colors, design, size, etc.) that you want to achieve.
Whether you’re doing things on your own or hiring a professional to take care of the entire installation process, it never hurts to have a good understanding of the characteristics of cement tile, the process of its installation and other important facts about cement and tiling.
The first thing we need to start with is what we call the subfloor or the layer of flooring on which your new cement tiles will be installed. In most cases, your subfloor will either be made of cement or wood.
Tiling a Cement Slab
Working with a cement slab (sometimes referred to as a “cement subfloor”) is generally easier and more reliable than trying to tile on top of a wood subfloor. This is because cement subfloors or slabs are, in most cases, much more “level” and stable for installation of new flooring. Wood subfloors by comparison are less reliable because they can become warped through temperature changes causing contraction and expansion of the wood.
Tiling a Wood Subfloor
While tiling a wood subfloor is generally considered more difficult and more unreliable than tiling over a cement slab, it’s not impossible to get the desired result you are looking for in your home, restaurant or establishment. The solution to tiling a wood subfloor or other uneven surfaces is to use thicker set to glue the tiles. It will also be helpful to use cement board or backer board over the wood subfloor to ensure durability and proper installation.
How to Cut Cement Tiles
Knowing how to cut cement tiles is an important process of cement tile installation. Without the know-how or ability to cut cement tiles, you’ll be left with requiring exact measurements, which is usually not a feasible option when homes, restaurants and other establishments have unique flooring layouts. It’s unlikely that the floor you are planning on laying tile for is going to be perfectly square or rectangular and have the exact size to make room for the tiles and grout spacing.
When cutting cement tiles, you are going to need a tile cutter (wet saw) to help you with your cement tile installation job. We recommend going with a higher-end tile cutter and quality blade tip (diamond) to ensure that you get a clean, quality cut on your title. Chances are you are making a good investment on the tiles you are installing into your home or establishment, which makes it just as important to invest in quality cutting tools to help you get the desired result.
Thankfully, you have two primary options for acquiring a quality cutting tool if you don’t know anyone who you can ask that already has one. You can either choose to buy one or rent. Renting will usually be your best bet if you are only planning on doing a single project and won’t need the cutting tool in the future. However, if you plan on using a cutting tool regularly or may need it in the future for additional projects, buying a quality tile cutting tool may end up being a better long term purchase.
One of the first places you’ll need to cut your cement tiles is after the dry fitting stage. After laying down bordering tiles won’t fit. This is where tile cutting comes into play with the wet saw, allowing you to customize each border tile to fit the size and shape of the room you are tiling.
How to Remove Grout Stains from Cement Tile
During the process of laying cement tiles, you’re bound to run into the issue where you have leftover grout stuck on the surfaces of the cement tiles. It doesn’t matter how experienced you are with using grout or laying cement tiles. It’s common for you to find what is often called a “grout stain” or “grout film” by the end of the installation process. Due to the way cement tiles are made, they are naturally very “porous,” meaning that they will absorb most parts of materials that come into contact with them, including substances like grout, water and other liquid-like substances. If you find yourself worried about staining your cement tiles, take precautions to try to avoid grout stains. The best way to do this is to pre-seal the tile as explained above. This is a penetrating sealer that is put directly onto installed but not yet grouted tiles. You simply apply the penetrating sealer, let it dry, and grout. If some grout has made its way onto your tiles, be prepared to do some scrubbing after installation. Here is the best method for removing grout stains from cement tile:
1) Wipe warm water onto the grout stained tile.2) Using 400 grit wet/dry sandpaper, gently scrub the area while regularly reapplying warm water.
3) Repeat as necessary, and wipe clean when finished.
Depending on the severity of the grout stain, you may need to use special grout stain removal solution from a home improvement store. However, always make sure to follow the manufacturer’s instructions regarding grout cleaning, based on the tile and substance’s suggestions.
Learn More about Cement Tile Installation
At Granada Tile, we are experts when it comes to anything and everything about cement tiles. From design, to creating and to installation of cement tiles, we are here to help! Give us a call or send us a message today with any of your questions about cement tiles and we’ll be happy to help. Each tile from the Granada Tile collections are handmade works of art, created specifically for you. We truly want you to be happy with your tiles.
Our Granada Tiles are completely eco-friendly. From start to finish, you will know that every tile in your home, restaurant or establishment won’t be harming the environment. From the earliest stages of production to the latest stages of replacing them, they will be put to good use without harming the environment.
Other Frequently Asked Questions
You can find other commonly asked questions about our tiles or the application/installation process of cement tiles below.
What sizes and shapes are available at Granada Tile?
For the Echo Tile collection, we offer a variety of sizes for squares and rectangles:
- 1” x 1”, 2” x 2”, 3” x 3”, 4” x 4”, 5” x 5”, 6” x 6”, 8” x 8”, 10” x 10”, 12” x 12”
- 1” x 2”, 1” x 3”, 1” x 4”, 1” x 6”, 1” x 8”
- 2” x 4”, 2” x 6”, 2” x 8”
- 3” x 6”, 3” x 9”, 3” x 12”
- 4” x 6, 4” x 8”
- 8” x 12”
We also offer other sizes and shapes for our other concrete tile collection. Contact us to learn more about available sizes and shapes.
Can I use cement tiles on walls?
Cement tiles can absolutely be used on walls, especially as a backsplash or a wainscot. You can get creative with your use of cement tiles and can even go as far as using them on your ceiling (but be sure your thinset is really fresh and active).
Is there any place that cement tiles should not be used?
It’s not recommended to use cement tiles in some outdoors environments. This is because of potential freezing that can occur, which can accelerate the wear-and-tear process on cement tiles. Cement tiles should also be avoided where a slipping hazard may be present (e.g., pathways, pools, etc.), where it will come into contact with harsh chemicals (like chlorine), or subjected to too much weight (i.e. on a driveway or garage floor).
Will the color of cement tiles ever wear off?
It is not likely that color in Granada Tiles will wear off, as the color is at least ⅛” deep. Some cement tile pigments are sensitive to sunlight, however, particularly some of our blue and green pigments. While these tiles won’t look the exact same after a decade of sun exposure, the fading brings out another level of beauty in the tiles, and we’re confident that you’ll love the way they look both now and many years into the future.
Did we miss a question you have about cement tiles or the tiles we offer at Granada Tile? Visit our FAQs page, give us a call, or send us an email at sales@granadatile.com and we’ll be happy to help!
Blogs About How to Lay Cement Tile
How to Install a Cement Tile FloorIn today’s design world, cement tiles have become a luxury that design magazines and world famous interior designers swear by for creating stylish spaces. But cement tiles don’t have to cost luxurious prices, especially not if you install them yourself. One of the most popular projects for homeowners is installing a cement tile floor, and this post gives you the tips and know-how you need to do it. If you’ve been wanting to save money on your floor remodel and want to use cement tiles to add high style in your space, get started with this post on how to install a cement tile floor.
How to Tile a Bathroom WallAdding gorgeous cement tile to a wall in your home adds stylish durability that you just can’t get with any other product. In a bathroom, cement tiles can help you protect the space from moisture and mold damage. Whether you want to tile the walls around the toilet and vanity, behind the sink, or tile around a shower or bathtub, cement tiles add color, pattern and texture to your bathroom and help you protect your walls at the same time. In this post, learn exactly how to install tile on a bathroom wall, including the materials you need and how to perform each step to do the job right.
How to Clean and Maintain Cement TilesCement tiles are known for their artisan-quality designs and for being very durable and long-lasting. However, cement tiles aren’t invincible to all wear and tear, especially in busy areas that see a lot of use, and they can get dirty, dull looking, and experience mild damage over time. If you have cement tiles in or outside of your home or business, it’s important to know how to clean and maintain them properly to protect your investment and keep them looking great for as long as possible. Learn our experts’ tips to clean and maintain your cement tiles in this blog post.
How to Seal Cement Tile GroutIf you’re considering a DIY tile project, you may be overwhelmed at all of the information about how to install different types of tile. While ceramic tiles only need to be sealed after grouting, cement tiles have different and additional sealing requirements. To make sure you don’t stain or damage your cement tiles during the tile installation process, they need to be sealed before and after grouting. Learn more about the importance of this crucial step in this post, including the materials you need and exactly how to seal your cement tiles before and after grouting.
213.788.4238
Sales@GranadaTile.com